Hello there!
This project is as simple as building a box…well, because you ARE building a box. Ha! Seriously, it’s that easy! 5 boards, only 2 different cuts, nails and glue. If you are a beginner builder, this project is the perfect start for you! And it’s pretty!
I followed the plans Liz posted over at Love Grows Wild. Thanks Liz!
Shanty 2 Chic has similar plans as well.
First things first…check your scrap wood stash! The drawer pulls were the only purchase I made. So this beautiful, rustic centerpiece only cost me $6.00 and took less than two hours to make {and that includes paint/stain drying time}
You will need:
3 – 1 x 6 cut to 22.5″
2 – 1 x 6 cut to 7″
Miter or circular saw
Kreg jig {I used finishing nails and glue and they worked just fine}
Tape measure
Drill
Sandpaper
Stain/Paint of your choice
2 drawer pulls {optional}
* Overall dimensions of this long and narrow box are 2′ long x 7″ wide
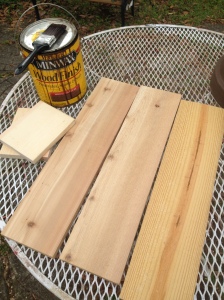
Cut your wood as directed. The 3 long pieces are your two sides and the bottom. The small cuts are your end pieces. I prefer to paint/stain my pieces before assembly.
I stained my wood with Minwax Special Walnut. Once dry, I painted over it with Sherwin Williams Eider White that was colored matched in my local Lowe’s paint department.
Using wood glue and nails, attach the two sides to the outer edge of the bottom board. Finish off your end caps the same way. Lightly sand the areas where you want the stain to show through. I absolutely love how this technique changes the entire look from new to rustic/worn/aged.

Optional final step – using a drill, drill holes for the drawer pulls to attach the end pieces.
Isn’t she pretty! Time to fill her with flowers!

Be sure to check back soon…my next post is about what you see under that box. My dining room table got a much needed face lift!!
Linked: Make It Pretty Monday
Linked: Sweet Sensations – Celebrate Your Story
Linked: Karen’s Up On The Hills – STTA # 54
Linked: Simply Designing – Whimsy Wednesday
Linked: The Curator’s Collection – Making Broken Beautiful
Linked: Designer Trapped – DIY Like A Boss
Linked: Designer Trapped – DIY Like A Boss
Linked: Chic on a Shoestring Decorating – Flaunt It Friday
Linked: My Crafty Spot – Sunday Showcase
Linked: Pretty Handy Girl DIY Like A Boss
Linked: My Love 2 Create – Creativity Unleashed
Linked: Simple Life of a Fire Wife – Inspire Me Monday
Linked: Rustic & Refined – Table It Link Party
Linked: Lovely Little Link Party
Linked: Show & Tell

As much as I love to collect boxes I should do this! Would love for you to share this great tutorial at Celebrate Your Story Link Party. The link up is at: http://www.thesweetsensations.com. Hope to see you there and have a great week!
LikeLike
Hi Sandra – Thanks for stopping by and for the invitation. I linked up! If you make this box there is a good chance it will become your favorite! Good luck building and please come back and share your creation with me.
LikeLike
Excellent, this is probably the perfect project for me to begin with! Thanks again for sharing over at Celebrate Your Story. I am going to pin this one, I bet there are a few other folks like me who need to know how to begin honing my skills!
LikeLike
This is definitely a must-do! It’s easy and looks pretty! I hope you give it a try. If you do, please send me a pic! Happy building!
LikeLike
Adorable and I love how easy you make it seem. I might have to dig my miter box out of the garage.
LikeLike
Thanks for your comment! It really is as easy as it looks! Starting digging and good luck! 🙂
LikeLike
WOW! you did a great job of making this box look like it is a genuine antique box! Thank you for sharing the how to! I hope you are having a great week so far!
Smiles!
Terry
LikeLike
Thanks Terry! Confession…I was impatient and slapped the paint on before the stain was dry. When the paint had (barely) dried to the touch, I started standing it. I’m not sure if that was the key to the look but I sure love it. I’m glad you do too. Happy Almost Friday!
LikeLiked by 1 person
Great project and great tutorial. Thank you for sharing. You are one of the fan favorites at the Sunday Showcase from the Make it Pretty Monday party at The Dedicated House. Here is the link so you can check out your feature. http://thededicatedhouse.blogspot.com/2016/02/the-sunday-showcase-from-make-it-pretty.html Hope to see you tonight at Make it Pretty. Have a great day. Toodles, Kathryn @TheDedicatedHouse
LikeLike
YAY! How exciting! Thank you Kathryn! I’ll be there – see you soon!
LikeLike
[…] and spirit. Lovely post. 3rd Place for Most Views from Make it Pretty Monday Southern Sawdust / Alabama Spice has a great tutorial on how to make a Wood Box Centerpiece. Head on over to pick up this […]
LikeLike
Thanks so much for linking up to You’re Gonna Love It! In fact, this project was chosen as one of my favorites this week! Make sure you swing by and grab an “I’ve been featured” button!
Thanks again! Love it!
LikeLike
Yay! Thank you Kim! How exciting! I will be sure to grab a feature button!
LikeLike
Love this! I made one sorta like it, but I didn’t put handles on it. That’s genius!!
LikeLike
Thanks Lori! I’ve made several of these and I love how each one seem to turn out different. Thanks for stopping by!
LikeLike